
Formative Evaluation Techniques for film and beyond
Dave Eresian, USA, Ryan Wyatt, USA
Abstract
This paper describes practical strategies and creative techniques for conducting evaluative research on a budget – including starting with the end in mind, taking an iterative approach, investing in creating activities and props, and leveraging off-the-shelf tools. It shares techniques used in the formative evaluation of the California Academy of Sciences planetarium film Earthquake.
Keywords: Formative Evaluation, Research
Introduction
Overview
This paper accompanies a “how-to session” to be held at the 2013 Museums and the Web conference. It shares practical strategies and creative techniques for conducting evaluative research on a tight budget, including starting with the end in mind, taking an iterative approach, investing in creating activities and props (as well as great questions), and leveraging off-the-shelf tools. It uses techniques from the formative evaluation of the California Academy of Sciences planetarium show Earthquake.
Readers and how to session attendees will learn:
- Methods for designing research activities that reveal insights about immersive, but non-interactive experiences (i.e. viewing a film) — without interrupting the immersive experience itself.
- How we used a mobile app to collect real-time feedback.
- How to build a self-serve feedback kiosk using off-the-shelf software like Keynote and Quicktime.
Project background
The California Academy of Sciences and Hot Studio, an experience design consultancy, have been working together since 2008. Hot Studio led the rebranding and website redesign to coincide with the opening of the new California Academy of Sciences facility. Since the website launch, we have continued to partner on several strategic and tactical projects.
In the spring of 2012, we collaborated on formative research on a rough cut of the Earthquake planetarium show. The overall goal was to evaluate the conceptual clarity of certain sequences of the film, and how well viewers could understand the geology content in the show, such as the causes of earthquakes. Our research was used to inform recommended adjustments to the film’s narration and visuals
Value of visitor research
As designers and problem solvers, we know the importance of incorporating feedback from real people into our design process. Visitor research helps build deeper empathy with audiences, as it enables us to witness experiences from their perspective. Research can reveal opportunities and inspire design ideas, and it can help us evaluate the effectiveness of our solutions. It can also help align teams around shared goals.
Challenges of doing research
When projects run on tight deadlines and budgets, however, incorporating visitor research can seem challenging. On the planetarium project we faced several challenges. We had a two week timeline and a team of two. How would we recruit and interview a large number of participants with our tiny project team? How might we collect quantitative data to support qualitative interview data? And finally, how might we design the research activities to foster rich conversations about specific sequences of the film, without interrupting the film’s playback? How could we best evaluate this immersive, but non-interactive experience?
Project Approach
The challenges described above pushed our team to be resourceful, organized, and creative. This paper describes the some of the keys to our approach, including:
- Start with the end in mind.
- Take an iterative approach.
- Create activities, props, and tools.
- Leverage tools wisely.
Start with the end in mind
Before you start any research project first clarify your goals. What exactly do you hope to learn? What questions do you need the research to answer? Which hypotheses do you need to validate? Then craft your approach to the research accordingly. Clearly articulated objectives will give you the focus you need to select research methods and activities, ask the right questions, and frame your results. This goal-directed approach is paramount for any research project. For rapid user research, consider the top few questions you need to answer in order to proceed to the next step of your project; focus your research on these core questions.
For the Cal Academy planetarium project, the high-level goals were to evaluate the conceptual clarity of certain sequences of the film, how well viewers could understand the geology content in the show, and to recommend potential tweaks to the film. Together with the filmmakers, we clarified which specific aspects of the geology content were most important, and which sequences of the film were potentially unclear. We discussed what could be easily modified (like narration) in the event that we wanted to recommend changes. Based on these goals we made a list of research objectives. And with clear research objectives in mind, we were well-equipped to plan our approach and activities, and start crafting an interview guide.
Take an iterative approach
When planning research, take an iterative approach so you can learn from your experiences and adjust as you go. So what does this look like? Rather than scheduling all your research in one contiguous block, break it up into a series of sessions and intervals. Build in enough time between sessions to review your findings and, if appropriate, revise your activities and materials.
For this project, we decided the best approach would be to conduct a series of special screenings of the show. After each screening we interviewed viewers about their experience. A pilot screening helped us to spot oversights in logistics—like the fact that we needed someone to act as a “traffic cop” and direct participants after the show. In the intervals between screenings, we synthesized and discussed our initial findings, which included specific recommendations for refinements to the film’s narration script.
Based on these recommendations, the Cal Academy filmmakers swiftly re-recorded the narration, giving our team the opportunity to evaluate the new version at the next screening. It was agile filmmaking at its best!
Create activities, props, and tools to enable insight into non-interactive experiences
Hot Studio has deep experience in conducting software usability studies, where we observe participants individually as they interact with a product to complete specific tasks. But for the Earthquake project, there was no explicit interaction; we couldn’t observe participant understanding directly.
In this case, the challenge was how to gauge understanding without interrupting the film—and how to do so with a large number of participants. To address this, we came up with a two-fold approach:
- Find a scalable way to collect quantitative info in real time during the film;
- Interview participants about their experience after the film.
Data Collection with the Hot Studio Mobile Research Application
We created an easy-to-use mobile app that participants could use while watching the film to log moments they thought were “unclear” or “clear.” Participants ran the app from their own cell phones to submit feedback. Our team aggregated and graphed the results to identify key points in the film which were unclear. Consider using the Hot Studio app for mobile data collection, or creating your own custom app.

After the screening, we interviewed participants about their experience. Rather than relying on verbal conversation alone, we created chaptered video clips of key sequences in the film, and set them up so that participants could view and control them on a laptop. These visual props facilitated very rich and efficient conversations—and proved helpful with people not fluent in English—much more so than if we only had verbal conversations.
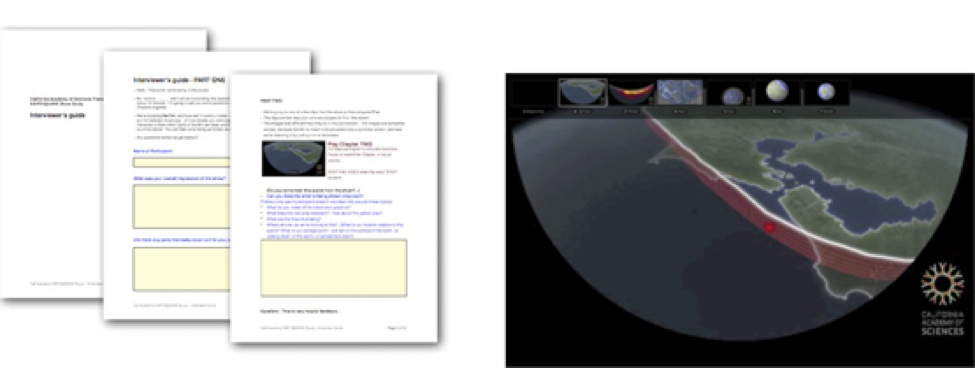
Figure 2. Users could view and control video clips on a laptop during their interviews. This supported rich, clear, and efficient feedback on the film.
Leverage tools wisely
To give you the bandwidth to scale your research, or to focus on certain aspects of the research, consider ways technology and tools can support you in the collection and organization of your data. For rapid research projects, tools can make a huge difference.
We created a centralized repository for interview data using a Google Docs spreadsheet. The simple fact that everyone on our team could update the findings simultaneously (without passing files back and forth) streamlined our process considerably.
One challenge on the Cal Academy project was accommodating overflow participants at our screenings. Even with our extended volunteer team, we had more participants than we could interview simultaneously—and some would simply leave instead of waiting until we were free to interview them.
Once we realized this, we used off-the-shelf tools to quickly create “self-serve kiosk” stations, which enabled overflow participants to record their feedback on the show verbally. Although the data from these self-serve sessions wasn’t as rich as that from our face-to-face interviews, we were still able to get extremely valuable information.
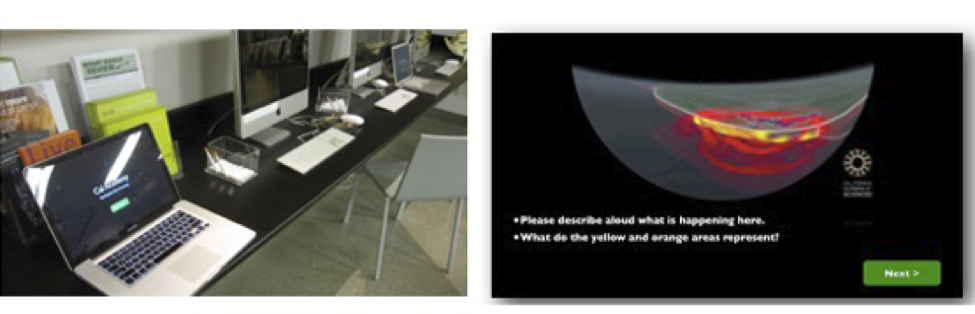
Figure 3. Self-serve kiosks enabled overflow participants to record their feedback.
How to create your own kiosk
When you think about PowerPoint or Keynote, you generally think about linear presentations, but both pieces of software can be used to create interactive, non-linear experiences. It is relatively easy to use Keynote or Powerpoint to create an interactive series of screens that present questions (or content) and solicit verbal feedback from visitors. It is also possible to use Quicktime to record the computer screen, along with the audio. This means that you can setup your laptop to run an interactive presentation, and record the verbal feedback of visitors as they step through your presentation. You can setup several laptops running your presentation software along with Quicktime recording, and invite visitors to use the laptop “kiosk” station to provide feedback.
Creating an interactive presentation
Here are the instructions for creating an interactive presentation, and using Quicktime to record the screen. First, we’ll create a simple presentation which contains two slides, with interactive “buttons” which link the slides to one another. Follow these steps:
- Open Keynote or Powerpoint and create a new document.
- Edit the default text on the first slide to read “Slide #1.”
- Add a rectangular shape to Slide #1 by using the Insert Menu and choosing “Shape.”
- Place the shape in the lower right corner of the slide.
- Label the shape “Next” by double-clicking on the shape and typing “Next.”

- Now create a second slide: In Keynote, click the “Slide” menu and choose “New Slide.” (In PowerPoint, click the “Insert” menu and choose “New Slide.”)
- In your newly created slide, edit the default text to read “Slide #2.”
- Add a rectangular shape to Slide #2 by using the Insert Menu and choosing “Shape.” Place the shape in the lower left corner of the slide.
- Label the shape “Back” by double-clicking on the shape and typing “Back.”
- Now make the shape labeled “Back” into a button which links to Slide 1: Click the shape labeled “Back.”
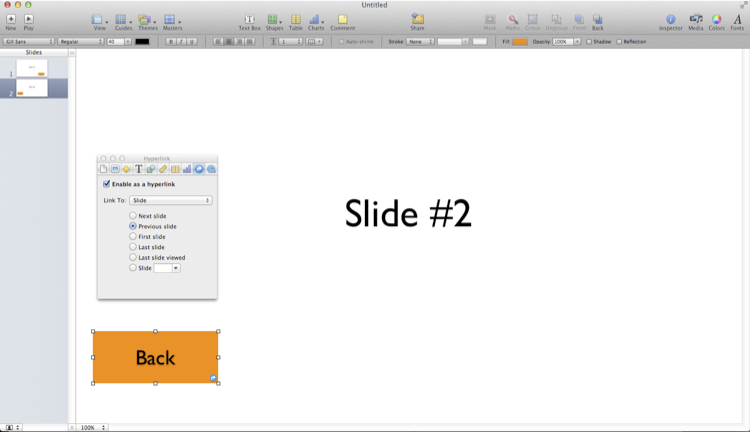
- If you’re using Keynote, look in the floating “Inspector” window. (If the Inspector window is not visible, click the “View” menu and choose “Inspector.”) Now click the “Enable as hyperlink” checkbox, make sure that “Slide” is selected in the “Link to” drop down, and select the “Previous slide” radio button.

- (If you’re using PowerPoint 2011, go to the Slideshow tab and click the “Action Settings” button. Choose Hyperlink and “Previous Slide”.)
- Now edit Slide #1‘s “Next” button by using the same method. Click on the shape, and add a hyperlink in the inspector (or the “Action Settings” in PowerPoint 2011).
- Now Play your presentation. When you click on the “Next” button on Slide #1, it will link to Slide #2. Clicking on the “Back” button on Slide #2 will link back to Slide #1. Use this approach to create your own custom interactive slides, which step through a sequence of questions you’d like your visitors to address.
Additional Touches for your kiosk content
You have learned to create buttons that link one slide to another. A couple of other simple techniques enable you to use this presentation technique as a “kiosk” tool:
- Add introductory slides to your kiosk explaining how to use your presentation, and inviting visitors to speak their answers for the computer to record them.

- Add a “Thank you” slide at the end of your presentation, and on it include a “Start New Session” button that links back to your first slide. This enables the next visitor to easily start the presentation again (without leaving presentation mode).
- Consider embedding video and audio on your slides to create rich experiences.
- Set the presentation to play automatically when opened and automatically restart if idle for more than 5 minutes (use the Inspector window, Document Tab).

Using Quicktime to record visitors stepping through your interactive presentation
The next thing you need to do is record the screen and audio – we’ll use QuickTime to do this:
- Open QuickTime (version 10 or later).
- Click the “File” menu and select “New Screen Recording.” A control panel will appear.
- To enable audio recording through the computer’s microphone, click on the Options triangle on the right side, and select “Built-in Microphone: Internal Microphone.”
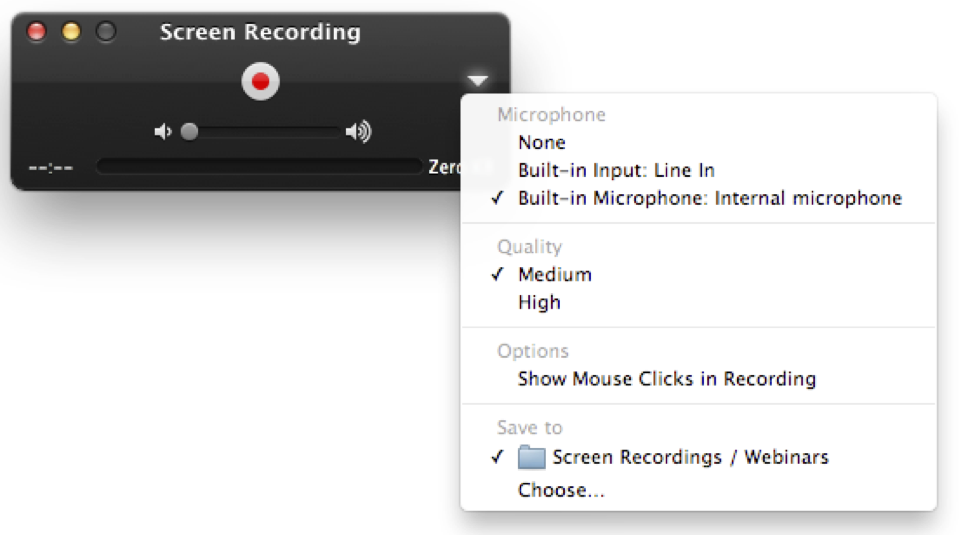
- Click the Record button, and QuickTime will begin recording everything that is displayed on your screen, plus audio.
Now start your Keynote or PowerPoint presentation. As you click thru the presentation, the screen will be recorded, as will the audio recorded through your computer’s microphones. To stop the recording, switch back to QuickTime, and press the stop button. Your recording will appear and you can play it back. Use this approach to record visitors as they step through your kiosk presentation.
Conclusion
Conducting evaluative research on a tight budget can be challenging. By taking the approach described in this paper, however, we successfully collected rich feedback from 60 participants, made two rounds of revisions to the film, and validated the changes—all in just two weeks. We started with the end in mind, took an iterative approach, created activities and props for our interviews, and leveraged off-the-shelf tools to create tools such as interactive “kiosks.” We hope that these ideas and how-to tips are helpful in your own projects.
Cite as:
D. Eresian and R. Wyatt, Formative Evaluation Techniques for film and beyond. In Museums and the Web 2013, N. Proctor & R. Cherry (eds). Silver Spring, MD: Museums and the Web. Published February 15, 2013. Consulted .
https://mw2013.museumsandtheweb.com/paper/how-to-session-formative-evaluation-techniques-for-film-and-beyond/